Tag Archives: Card

A Simple Card

Sometime you just need a card to show someone you care.

So open up the Cricut app and away we go.  Find a card you like, find some paper.  Get a mat, put the paper on and load into the cricut.  Make sure you put the scoring tool in, and change it to a pen when you need to.

I wanted to say that I am not sure what direction life is taking us right now.  We are together in this journey.

Plenty of room to write something inside.

I did let the Cricut write it in here.  Just covered it up so you could see the space.


Steve

If you would like to get an email notification when I post a new blog just shoot me an email with your email!!!

lu@penfolds.net

Click on the heart below if you like this post, or on the broken heart if you don’t.

3
0

A Birthday Gift

A very dear friend and second mom has a birthday this week! I love that it is so close to Halloween and we always make her a Halloween themed card! The problem always comes to what gift to send.  She sends cards to all of us for EVERY holiday! She is in her later life and recently has had some health concerns that are giving her a little less energy to do things. Luckily when I spoke with her a couple of weeks back she told me she would love if I would send her some cards to put together. She even told me what kind she wanted!!!   I was so relieved! She wanted the one we call a 5 step card. We cut the bases and a coordinating paper and she can use it for any occasion she wants!


Here’s her card!


She called me this afternoon and said she got a package and was jumping up and down, even though she can’t anymore! I’m so glad she liked it and I really get excited when I get feedback!


Thanks for listening to my ramblings!


Lu

If you would like to get an email notification when I post a new blog just shoot me an email with your email!!!

lu@penfolds.net

Click on the heart below if you like this post, or on the broken heart if you don’t.


3
0

Just Another Birthday Card

This time it is our son’s birthday! Elephants are his favorite so we had to do something with that.


Thanks for stopping by!

Lu

If you would like to get an email notification when I post a new blog just shoot me an email with your email!!!

lu@penfolds.net

Click on the heart below if you like this post, or on the broken heart if you don’t.


4
0

Dino Birthday Card

It was our sweet granddaughter’s birthday this month and she loves dinos! So we decided to make a shaped card for her!

Here are the elements that we cut from Cricut.


This is the inside of the base.


Some people do the shape just on the front side of the card but we like it shape on both front and back.

We wanted it to say Happy Birthday but weren’t sure how to make it fit! We did not want to hand write it! So here are the elements of that before they were put together. We found that the cutting small things out of thin paper results in tears and tears! But there is a cheap solution! We have been using clear contact paper. It is sometimes tricky to peel that off after it is cut but sure saves paper and since the thinner paper is usually you designs and a little more expensive, it is well worth the contact paper!


Here it is put together.


And here is the finished card! We used the shiny glossy stuff on a few spots, just for fun!


Thanks for coming to the site!

Lu

If you would like to get an email notification when I post a new blog just shoot me an email with your email!!!

lu@penfolds.net

Click on the heart below if you like this post, or on the broken heart if you don’t.

4
0

Can’t Wait to Make This a Cricut Project

So what do you do when you can’t sleep? I mistakenly got on Pinterest!

I found this fun card and decided that 4 in the morning was a great time to try it!! It looked easy enough. Then as I started to look at the directions the measurements were all in cm!! Good thing I had a ruler that had cm and inches! It took a little trial and error but I think for a first try it turned out pretty cute! The only thing is that I want it to stand up better than it does and I don’t want to have to cut or score it by hand.  So this will getting put into Cricut very soon!!! If you are interested in how to get something like this to cut and score on the Cricut, I can teach you!

Thanks for coming to my blog!

Lu

If you would like to get an email notification when I post a new blog just shoot me an email with your email!!!

lu@penfolds.net

Click on the heart below if you like this post, or on the broken heart if you dislike.


1
0

Butterfly Card Kit

This fun kit is all about the butterflies! We have just 2 sets that are ready to be put together! It’s the perfect opportunity to have some girl time with your BFF! There are 8 cards with envelopes and all the goodies you need to make them! You can schedule a time to come to us and put them together or just get together at your house! 


We have 2 of these kits available. If we have the participation we will add more classes like this!

We can hold a class at our location for you to come and make up the kit.  Price is $16 plus tax.  You need to bring your own adhesives (tape runner, pop ups, glue dots, and liquid glue)

If you would would like me to make you up a set, the price will be $20 plus tax (additional shipping charges if you need it shipped)


Thanks for reading our blog!

Lu

If you would like to get an email notification when I post a new blog just shoot me an email with your email!!!

lu@penfolds.net

Click on the heart below if you like this post, or on the broken heart if you dislike.

3
0

Fun Cards

We had a couple of birthdays that we wanted to make cards for. One was for our daughter and one was for a dear friend. We saw this card on the internet and wanted to do it! The problem was the same as we always have, doing it by hand is too time consuming! So to the Cricut we went!

Steve enjoys figuring this kind of thing out and so he got it into the software so we could try it out! It still needs a few things made better but it worked great for the first try! 


It is a pull card and when you pull it the things stand up! Hopefully you can see that in the photos!


This one is for our daughter, she loves giraffes!


Picture looking down on it from above.


This one is for our friend, the mermaid!


Thanks for dropping in!


Lu

If you would like to get an email notification when I post a new blog just shot me an email with your email!!!

lu@penfolds.net


0
0

Simple Gnome Card

Sometimes you just need a simple card.

I needed to make a card for Lu.  Something simple, yet handmade,  I discovered recently that she like gnomes.  Her favorite color is yellow.  On my quest to find some yellow paper to make her a card, I found the bright yellow paper, and then the design in her paper scraps.  I remembered we had downloaded a gnome picture from DesignBundles.net.

How to put this together?  I wanted to first cut out the gnome on the front cover with the Cricut machine, and put the print behind to show the gnome. Then I found that to be too complex for me!

I decided to cut out the card base and the front on the Cricut.  I used a double score line for the card base to fold in half.  Then I thought, maybe I would have the Cricut draw the gnome with a black pen.  That works.  I found a cute saying for gnomes.

At our house, we look on the back of the card for the date.  That helps to put it in a scrapbook later.  No, we don’t look for the Hallmark brand like some people do.

Lu noticed some yellow paper in the trash can before I gave her the card.  She knew I was up to something.  Hard to keep secrets from her.

Steve

I have the best husband! Thanks buddy!!

Lu

If you would like to get an email notification when I post a new blog just shot me an email with your email!!!

lu@penfolds.net

0
0

Cardkit

I bought this kit at my favorite store! I just wanted to see what they thought went together and how they said to do them.

There are no instructions or suggestions. This is what comes in the kit. It says it makes 12 cards.

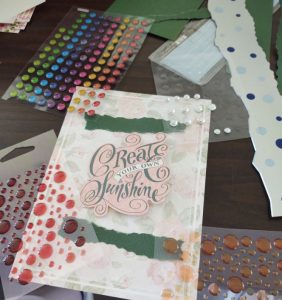
I don’t think that most of this even goes with these card bases. The colors and tones are way off. So the first thing I did was to sort out what I thought would work.

The pieces all came with “pop up” squares already on them.  They didn’t really pop up far enough to tell that you use a pop-up. You can see on some of them I just put tape on them and put them flat down, I didn’t take their “pop up” off.  In this picture, you can see how much more space my pop up leaves.

The next thing I did was try to find a paper that matched or complimented.  This is usually the hardest part of the design.  It is also one of the parts I like doing, especially when you get it just right. My green was just a little off of the shade I wanted so I sanded it.

This is a white core paper and sanding it makes a big difference. Sanding a non-white core paper also changes the color of the paper and I will show you that on a different set of cards.

Finding the right embellishment can be tough as well.  I like to get several out and lay them on my project to see what I like.

The other thing that people ask me is, “Do I measure to get my things straight and evenly spaced?” Those of you that have had a class with me know that is a big NO!! Nothing needs to be that precious. But here are a couple of tips: an odd number of embellishments usually look best, so start by putting one in the center, then but one on each end equal distance from the edge, then find the center between that one and the one you have already in the middle.

I ended up only doing 6 cards because of the lack of embellishments that I felt worked. So at some point, we will come back and do the other 6.


Thanks for reading my blog!

Lu

P.S. If you would like to get an email notification when I post a new blog, please hit the subscribe button!!

[subscribe2]


0
0

A Birthday Gift

Hello!

My daughter-in-law’s birthday was in May.  With us living so far apart, it is hard sometimes to know what to get her. This year Alex said they had seen some of those decorative blocks and she liked them. So, I decided to try to make her some.  They had only seen the ones with one side done.  But I thought I would make her some multi-sided so that she could have them out all year-round. I didn’t make them just holiday-themed; there are a couple of more generic sides. The blocks are small (not quite 2″) and that was a challenge to find things that fit. I enjoyed the way they turned out!  I hope she likes them as well!


She is a big Disney fan so I pick up anything Disney when I find it cheap! Her husband told me that Ariel is the princess she was into at the moment. I’ve had this sticker for a while and I used it to make this card.  I love how the colors came together and I love the green paper!

Thanks for checking in!

Lu

P.S. If you would like to get an email notification when I post a new
blog, please hit the subscribe button!!

[subscribe2]

0
0