Tag Archives: flowers

Cardkit

I bought this kit at my favorite store! I just wanted to see what they thought went together and how they said to do them.

There are no instructions or suggestions. This is what comes in the kit. It says it makes 12 cards.

I don’t think that most of this even goes with these card bases. The colors and tones are way off. So the first thing I did was to sort out what I thought would work.

The pieces all came with “pop up” squares already on them.  They didn’t really pop up far enough to tell that you use a pop-up. You can see on some of them I just put tape on them and put them flat down, I didn’t take their “pop up” off.  In this picture, you can see how much more space my pop up leaves.

The next thing I did was try to find a paper that matched or complimented.  This is usually the hardest part of the design.  It is also one of the parts I like doing, especially when you get it just right. My green was just a little off of the shade I wanted so I sanded it.

This is a white core paper and sanding it makes a big difference. Sanding a non-white core paper also changes the color of the paper and I will show you that on a different set of cards.

Finding the right embellishment can be tough as well.  I like to get several out and lay them on my project to see what I like.
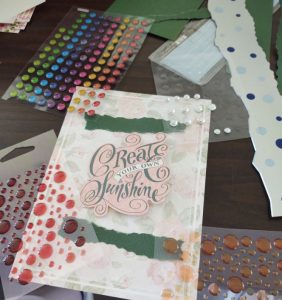
The other thing that people ask me is, “Do I measure to get my things straight and evenly spaced?” Those of you that have had a class with me know that is a big NO!! Nothing needs to be that precious. But here are a couple of tips: an odd number of embellishments usually look best, so start by putting one in the center, then but one on each end equal distance from the edge, then find the center between that one and the one you have already in the middle.

I ended up only doing 6 cards because of the lack of embellishments that I felt worked. So at some point, we will come back and do the other 6.


Thanks for reading my blog!

Lu

P.S. If you would like to get an email notification when I post a new blog, please hit the subscribe button!!

[subscribe2]


0
0

Shaker Card Kit

I saw this card kit at one of my favorite stores and decided to get a couple to put together. I bought several different ones so we will talk about the others later.

This one was a shaker card, meaning you put glitter or something small behind a piece of acetate. Everything was included in the kit to make 6 cards, 2 of each design.

Box that the card kit came in.


I should tell you that I have never made a shaker card. I know how to but haven’t really ever made one.  I didn’t think about how much of the glitter/confetti to put in. The directions didn’t say.  I saw that the kit comes with 6 cards and 2 packs of confetti, so a third of the pack of glitter per card?

Card base and front. Glitter


Well, those of you with experience making these will know that it was way too much!!! I didn’t really get it right until about halfway through.

Using the mathematical approach. WAY TOO many glitters!
Left: Correct Amount. Right: TOO much. Lol


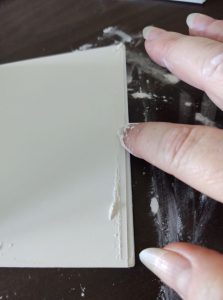
My next mishap was the aligning. They had all the adhesive already so I just peeled and lined up the card front. Well, I guess I’m not too good at that either!!! They are all off at least a little! Then at least one side is sticky. My solution was of course good old baby powder!

It has its own adhesive for the cover.
Using baby powder to cover the adhesive overhang.


I’m posting this to tell you all that no one gets it right the first time and that’s ok!!! If you get a card from me and you can’t read the sentiment because of too much bling in the shaker card, know that I love you so much that I wanted you to have a BIG, BIG party!!!!

Full set of shaker cards, in varying degrees of glitterfied!


Thanks

Lu

P.S. If you would like to get an email notification when I post a new blog, please hit the subscribe button!!

[subscribe2]

0
0

A fun card


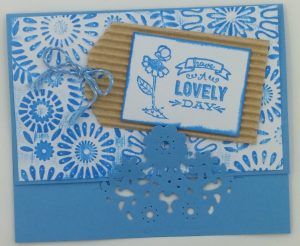
This week I got a couple of new tools and so I’m just trying to learn how to use them. Some are die cuts that make cool things on cards and edges. And then I got a thing to help us take better pictures. I hope they both work out. So anyway it has taken me some time to figure some of this out. So here is just one simple card I made today! I’m sure I’ll have more to show you soon!!!

Lu

P.S. If you would like to get an email notification when I post a new blog, please hit the subscribe button!!

[subscribe2]

0
0

Hello Again Finally

Wow! It has really been a year since I have been on this blog and I apologize to all of you! We have had some excitement in our lives! Steve lost his job in Utah and we lost 2 very close people to us. Then Steve got a job in Missouri!! He has been here since October 2015. I stayed in Utah and sold our home and have now joined him here in Missouri! I think I am settled enough to get back to this blog consistently, at least that’s my goal!!!

So here is a quick and easy way to make flowers using your cutting system and your corner rounder!!

Cut 3 different size circles with your cutting system, I like to use different papers. Also, it is a little easier with something thinner than heavy cardstock but I did use cardstock on some of mine. Fold your circle in half and round the ends off with the corner rounder. Notice how far the circle goes into the rounder because this affects the shape of your petals. Now unfold the circle and fold it in the opposite direction and punch again. Do this 2 more times folding to what you might call the diagonals. Repeat this for all 3 circles. Now layer the circles together from largest to smallest and you have a cute flower that matches any project!!!


Lu

P.S. If you would like to get an email notification when I post a new blog, please hit the subscribe button!!

[subscribe2]

0
0